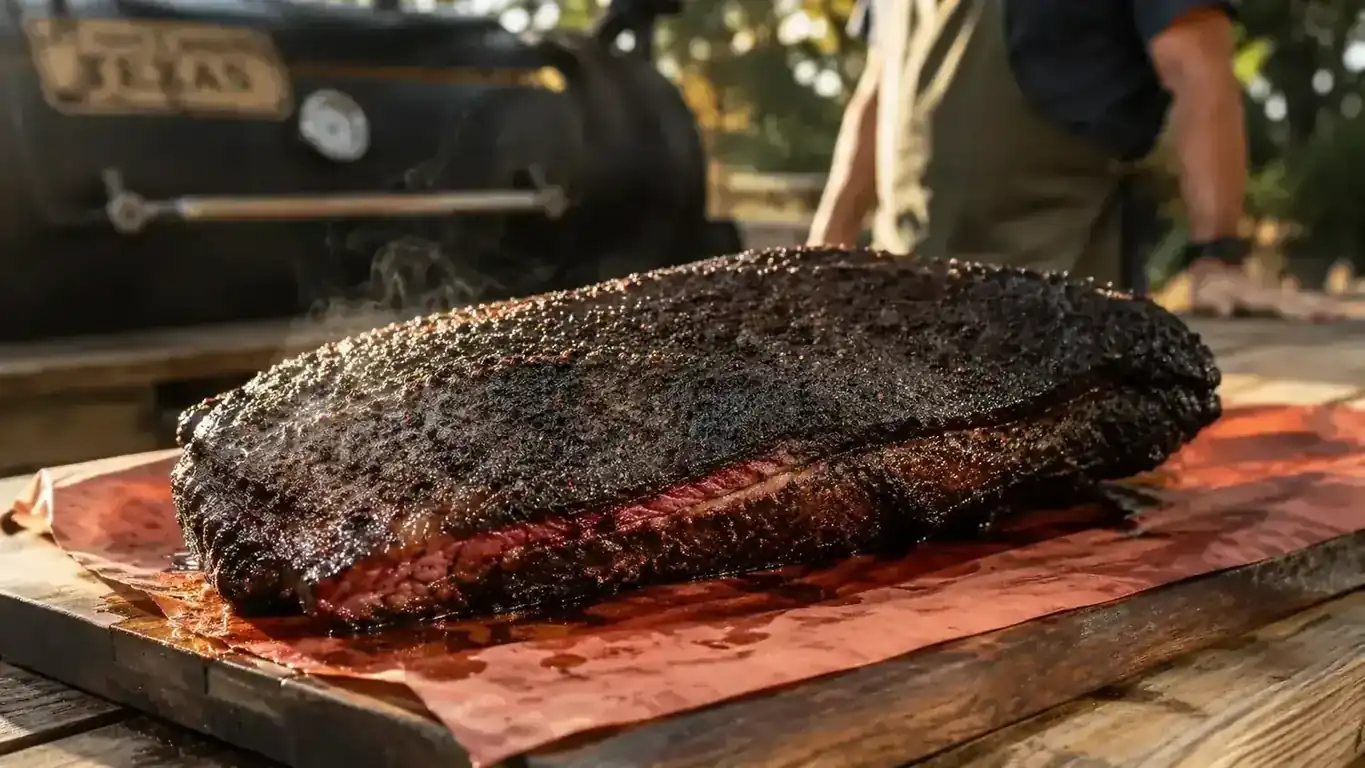
Brisket has a reputation for being the hardest cook in BBQ, and honestly, a lot of that reputation is earned. I burned two briskets on a cheap offset smoker before I figured out what I was doing wrong. The fire management alone was exhausting, and watching the temperature swing 40 degrees every time I added a log got old fast. Then I switched to a pellet grill and the whole thing changed. The Z Grills ZPG-450A2 holds temperature well enough that a 12-hour brisket cook does not have to mean 12 hours of standing at the grill. This guide walks through every step I use, start to finish.
You do not need fancy competition-grade gear to get a good brisket. You need a steady temperature, a reliable thermometer, and patience. A pellet grill covers the first one for you. The rest is just following the process and not opening the lid every hour to check. I have cooked brisket on this grill a dozen times now and the results are consistently better than what I was pulling off that old offset.
Want a pellet grill that holds 225F for 12 hours without you babysitting it?
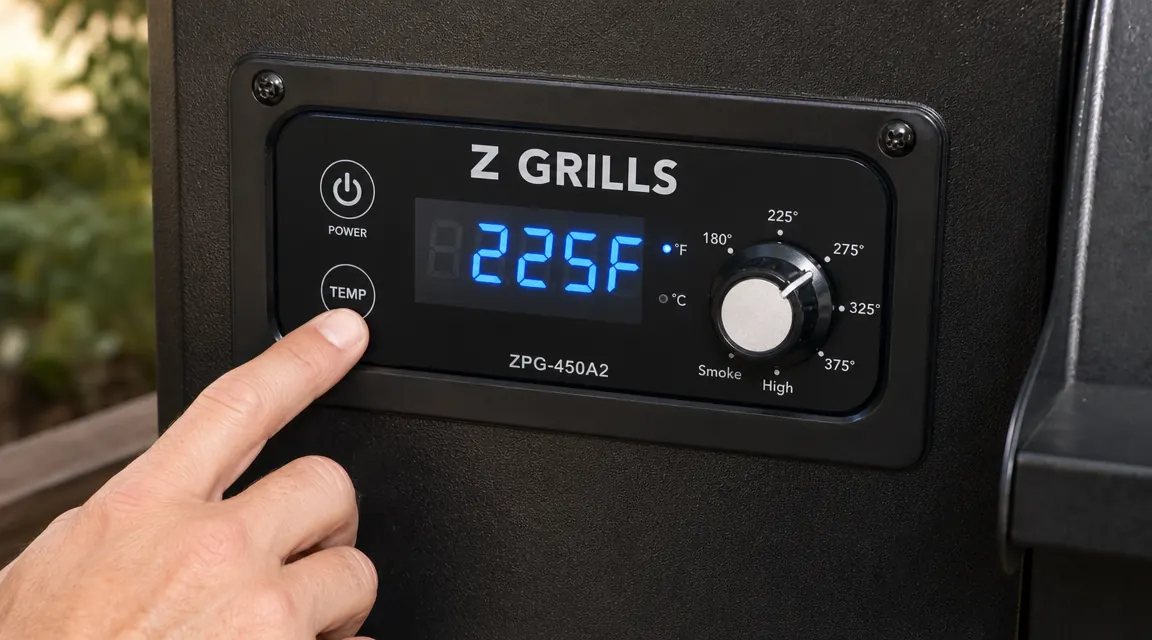
The Z Grills ZPG-450A2 has a PID V3.0 controller that keeps temperature within a few degrees for the entire cook. 459 square inches of cooking space handles a full packer brisket with room to spare. Rated 4.4 stars across more than 6,400 reviews.
Amazon Check Today's Price on Amazon →Step 1: Choose the Right Brisket Cut
Buy a whole packer brisket, not just the flat. A packer includes both the flat (the leaner, thinner section) and the point (the fattier, thicker section). The flat is what you slice for plates. The point is where chopped brisket and burnt ends come from. Separating them is done at the end, not the beginning. If your butcher only has flats, that is fine for a first cook, but a whole packer gives you more margin for error.
For a first cook, look for a brisket in the 10 to 14-pound range after trimming. Prime grade will have more intramuscular fat and stay more forgiving through the stall. Choice grade works fine and costs less. USDA Select is too lean for a low-and-slow cook and will dry out. Pick one that has good flex when you hold it in the middle. A stiff brisket is usually an older, tougher cut.
The Z Grills 450A2 has 459 square inches of main cooking space. A 12-pound trimmed packer will fit diagonally on the main grate with clearance on both sides. If your brisket is pushing 15 pounds, you may need to place it with the flat end slightly over the upper rack edge, or go flat-only for your first run.

Step 2: Trim the Fat Cap to About a Quarter Inch
Most packer briskets arrive with too much fat on the cap. Hard white fat sitting more than a quarter inch thick will not render down during the cook. It just insulates that side of the meat and slows everything down. Use a sharp boning knife and trim the cap to roughly a quarter inch all the way across. Pull out any hard pockets of fat you find between the flat and the point too. Those will never break down and they prevent the rub from reaching the meat underneath.
You also want to remove the thick fat seam on the underside, where the two muscles meet. Getting a knife in there and cleaning it up lets the rub penetrate and helps the smoke get into both muscles evenly. Take your time on this step. A good trim job makes everything else easier. Plan for 15 to 20 minutes of trimming on a full packer, and keep a trash bowl nearby so you are not hauling fat scraps back and forth across the kitchen.
Step 3: Season Simply and Rest in the Fridge Overnight
I have tried probably eight different brisket rubs over the years, and I keep coming back to the same thing: equal parts kosher salt and coarse black pepper. This is the standard Central Texas rub. It forms a thick, crunchy bark, does not burn the way sugar-heavy rubs can on long cooks, and does not compete with the smoke flavor you are building. If you want to add garlic powder, go ahead, but do not go beyond that. The smoke and the beef should be the main event.
Season the brisket liberally on all sides, including the fat cap. Press the seasoning in with your hand rather than just dusting it on. Then place it uncovered on a rack in the fridge for at least four hours, and ideally overnight. The salt draws some moisture out and then pulls it back in, seasoning deeper into the meat and helping the surface dry out for better bark formation.
Pull the brisket from the fridge about 45 minutes before it goes on the grill. Bringing it closer to room temperature takes some of the cold shock off and helps the cook start more evenly. Do not skip this part, especially in winter.
Step 4: Set Up the Grill and Get to 225F
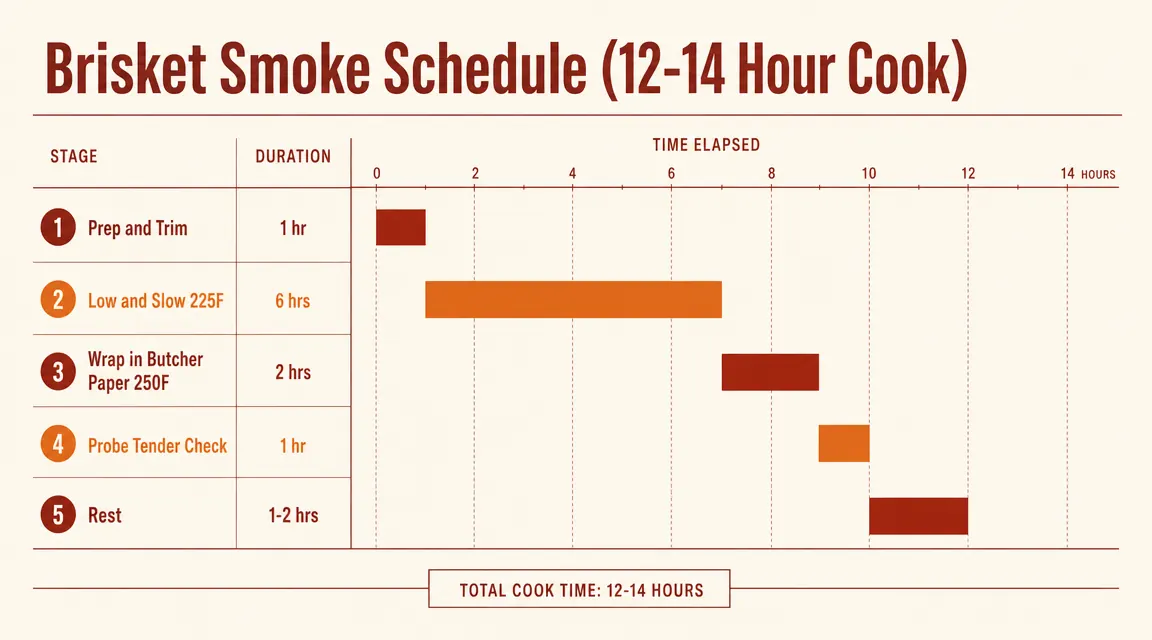
Fill the Z Grills 450A2 hopper before you do anything else. A full packer brisket cook runs 12 to 16 hours depending on the size of the cut. You do not want to run out of pellets at hour 10. I use a hickory or post oak pellet for brisket. Cherry and apple are great for pork but they produce a softer smoke that tends to get lost on beef. Hickory gives you that deep, slightly sharp smoke you expect from a real Texas-style brisket.
Set the controller to 225F and let the grill come to temperature with the lid closed. On the 450A2 with the PID V3.0 controller, this takes about 10 to 15 minutes. Wait until the temperature settles and stops climbing before you put the brisket on. A grill that is still hunting temperature when you load the meat will give you an uneven start on the first hour of the cook.
Place the brisket fat side up, with the thicker point end toward the hotter side of the grill if your setup has directional heat. The point can handle more heat. On the 450A2 the heat distributes through a convection fan and a heat deflector, so fat-side-up is the main thing that matters. The fat cap acts as a self-basting layer over the flat throughout the cook.
Every time you open the lid, you lose 25 to 50 degrees and add real time to your cook. Trust the process and leave it alone.
Step 5: Monitor Internal Temperature and Manage the Stall
Insert a probe thermometer into the thickest part of the flat, not the point. The flat is the harder muscle to get right. If the flat finishes correctly, the point will be fine. On a wireless thermometer with a second probe, I put that second probe near the grill grate to cross-check the ambient temperature against what the controller is reading. Small discrepancies are normal, but if they are more than 15 degrees off, check for a hot spot.
Around 155F to 165F internal temperature, the cook will seem to stop. The temperature will plateau and may even drop a degree or two for a period. This is called the stall, and it happens because moisture evaporating from the surface of the brisket is cooling it as fast as the grill is heating it. It is completely normal and can last two to four hours on a large cut. First-time brisket cooks panic here. Do not panic.
You have two choices here. You can wait it out, which is called the naked cook, and you will get a thicker bark but a longer total cook time. Or you can wrap the brisket in butcher paper at the stall. Butcher paper lets some steam escape and preserves most of your bark while pushing through the stall faster. I wrap in unlined pink butcher paper, not foil. Foil traps all the steam and turns the bark soft. Wrap it tight, put it back on the grill, and keep the temperature at 225F.
A wireless thermometer here is not optional, it is necessary. You cannot check progress without opening the lid, and opening the lid repeatedly on a long cook adds hours. Set the thermometer alarm for 195F so you know when to start checking for probe tenderness. If you want to read more on wireless thermometer options, the Govee wireless thermometer review covers the budget end of that category well.
Step 6: Pull at 203F or When Probe-Tender, Then Rest
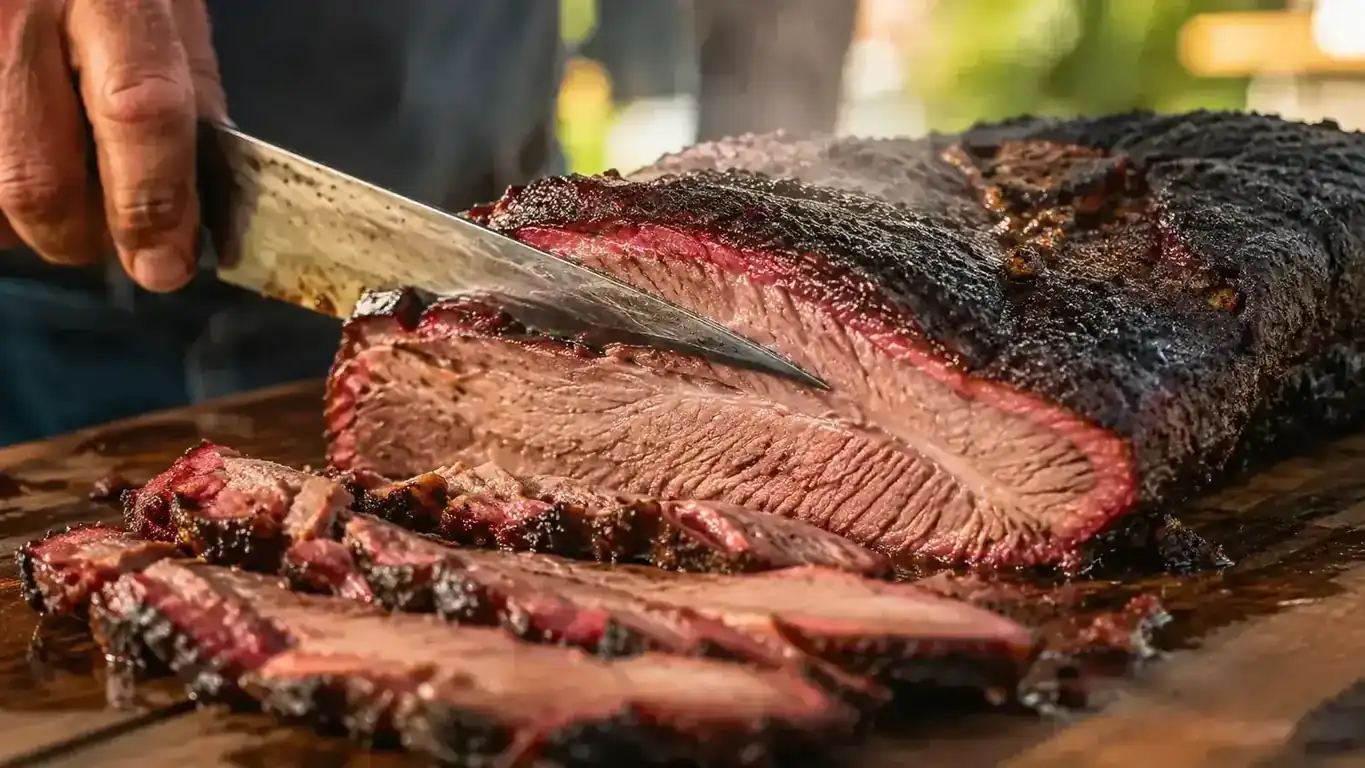
The target internal temperature for a finished brisket is around 200F to 205F. But temperature alone is not the whole story. The real test is probe tenderness. When you slide a thermometer probe or a toothpick into the thickest part of the flat and it goes in with zero resistance, like pushing into warm butter, the brisket is done. That usually happens between 198F and 205F, depending on the individual cut and grade.
Pull the brisket off the grill while it is still wrapped. Place it in an empty cooler lined with a layer of towels, add more towels on top to insulate, and close the lid. Let it rest for at least one hour. Two hours is better. The rest allows the muscle fibers to relax and reabsorb the juices that have been pushed toward the center during cooking. If you slice immediately, those juices run straight out onto the cutting board and the brisket dries out within minutes.
You can hold a wrapped brisket in a towel-lined cooler for up to four hours without any quality loss. This is how competition teams time their cooks when they need the brisket to be ready at a specific serving window without rushing the rest.
What Else Helps
A wireless dual-probe meat thermometer is the single biggest upgrade you can make to a long cook like this. Being able to watch the internal temperature from inside the house, without lifting the lid, saves fuel and cuts total cook time. Pair the grill's built-in temperature reading with a standalone thermometer and you have a reliable cross-check for the whole session. I check it from my phone every 30 minutes or so rather than camping next to the grill.
Pellet quality matters more than most people think. Cheap pellets from a big-box store often have moisture absorption issues that cause inconsistent burn and temperature swings. For brisket, I stick to name-brand oak or hickory pellets and keep the bag sealed and stored indoors between cooks. If your pellets have been sitting in an open bag outside for a month, they are probably absorbing ambient humidity and will burn inconsistently.
Keep the grease bucket emptied before a long cook. The 450A2 has a grease management tray and a removable bucket on the side. A full bucket from a previous cook can overflow or become a fire hazard during a 12-hour session. Give the drip tray a quick wipe and empty the bucket before you fire up. It takes three minutes and prevents a mess.
Finally, do not slice the whole brisket at once. Slice only what you plan to serve in the next 15 minutes. Unsliced brisket holds its moisture far better than sliced pieces sitting on a board. Sliced brisket dries out noticeably within 20 minutes at room temperature. Keep the unsliced portion wrapped until the next serving. This one habit will change how your brisket tastes to the people eating it.
The Z Grills 450A2 is what I reach for every time a brisket is on the menu
The PID V3.0 temperature controller keeps the 12-hour cook steady without constant adjustments. The 459 square inch cooking surface handles a full packer brisket. If you want the full rundown before buying, the Z Grills 450A2 review covers 18 months of real use. Over 6,400 ratings back it up at a price well under most competitors.
Amazon Check Today's Price on Amazon →